uniapp离线打包(Android)篇
开发环境
- 下载 HBuilderX。
下载 Android Studio,地址:Android Studio官网 OR Android Studio中文社区。
下载 Android 离线SDK。Android 离线 SDK 目录说明:
|-- HBuilder-Hello                App离线打包演示应用
|-- HBuilder-Integrate-AS        集成uni-app的最简示例
|-- SDK                            SDK库文件目录
|-- Feature-Android.xls            Android平台各扩展Feature API对应的详细配置
|-- Readme.txt                    版本说明文件及注意事项
|-- UniPlugin-Hello-AS            uni原生插件开发示例
注意: HBuilderX 的版本号和 Android 离线 SDK 的版本号必需一致。如果版本不一致,app 启动时会弹出版本不一致的提示框。
查看 HBuilderX 版本号:在HBuilderX 编辑器,菜单栏:帮助 -> 关于。或者在终端,cd 到项目的根目录,执行 npm run info。
查看离线 SDK 版本号:SDK 下载页面有说明对应的版本号。
申请 Appkey
AppKey,是用于 Android 离线打包配置。
3.1.10版本起需要申请Appkey。
创建应用
方法一
- 在 HBuilderX 编辑器,打开
manifest.json文件,点击 “应用标识(AppID)” 右侧的 "重新获取"。 - 登录/注册账号。
- 确认弹框,点“继续”。
- 打开 https://dev.dcloud.net.cn/pages/app/list,查看已创建应用。
方法二
- 登录Dcloud 开发者中心(需要注册账号)。
- Dcloud 开发者中心 -> 应用管理 -> 我的应用。
- 点击页面右上角创建应用,填写应用类型、应用名称、应用描述,再点提交即可。
新增应用的平台信息
点应用列表中的 应用名称 -> 各平台信息 -> 新增。
填写在平台的信息,主要信息如下:
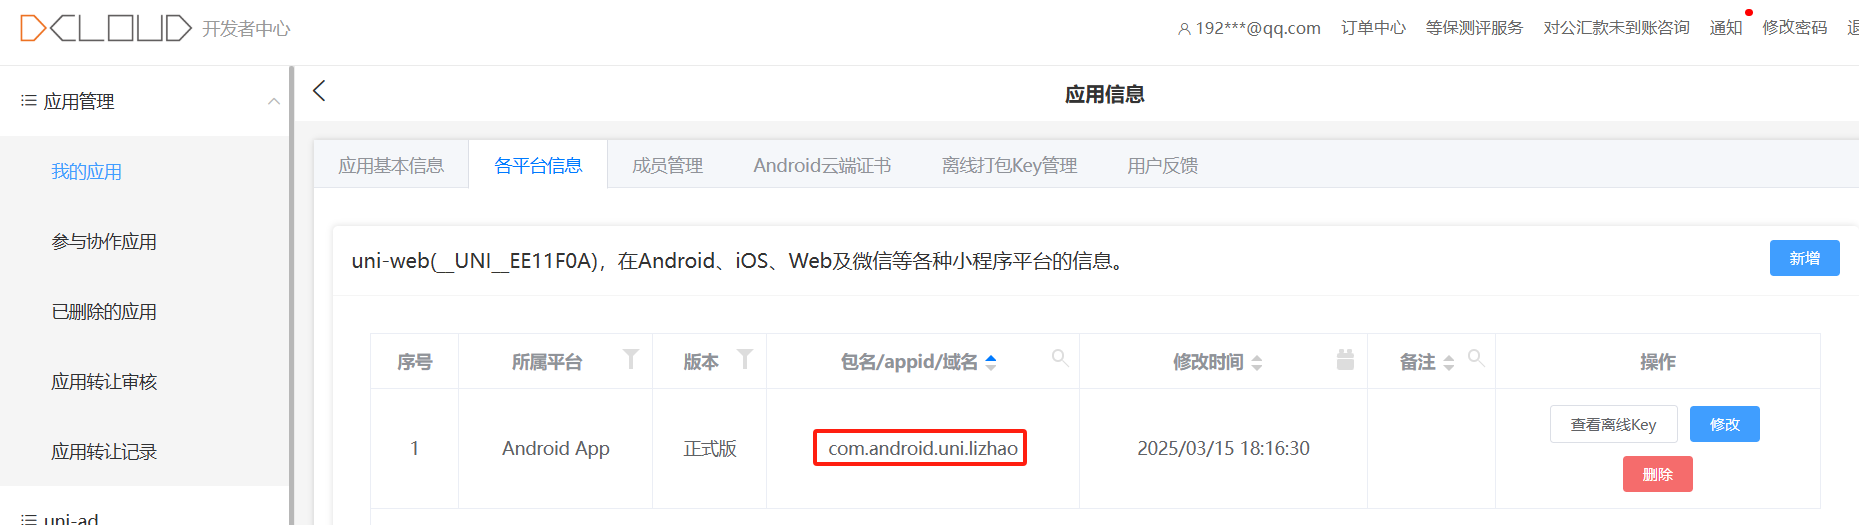
- 包名:必填,用 Android studio 新建工程时,项目信息中的 Package name 值。包名格式:以下划线或字母开头,可包含数字、字母、下划线和点,且以点分割的内容。
- Android 应用签名SHA1值:必填。
- Android 应用签名MD5:选填,一键登录需要使用应用签名 MD5。
- Android 应用签名SHA256:必填。
Android 应用签名 SHA1、Android 应用签名 MD5、Android 应用签名SHA256 都与签名证书相关:
# 生成签名证书
keytool -genkeypair -alias android -keyalg RSA -keysize 2048 -storetype PKCS12 -keystore android-keystore.p12 -validity 3650 -storepass 123456 -dname "CN=localhost, OU=lizhao, O=lizhao, L=HZ, ST=ZJ, C=CN" -ext "SAN=dns:localhost,dns:*.izhao.com.cn,ip:127.0.0.1,ip:::1"
# 查看签名证书信息 keytool -list -v -keystore android-keystore.p12 -storepass 123456# 查看 md5 指纹 keytool -exportcert -keystore android-keystore.p12 -storepass 123456 -alias android -rfc | openssl x509 -noout -fingerprint -md5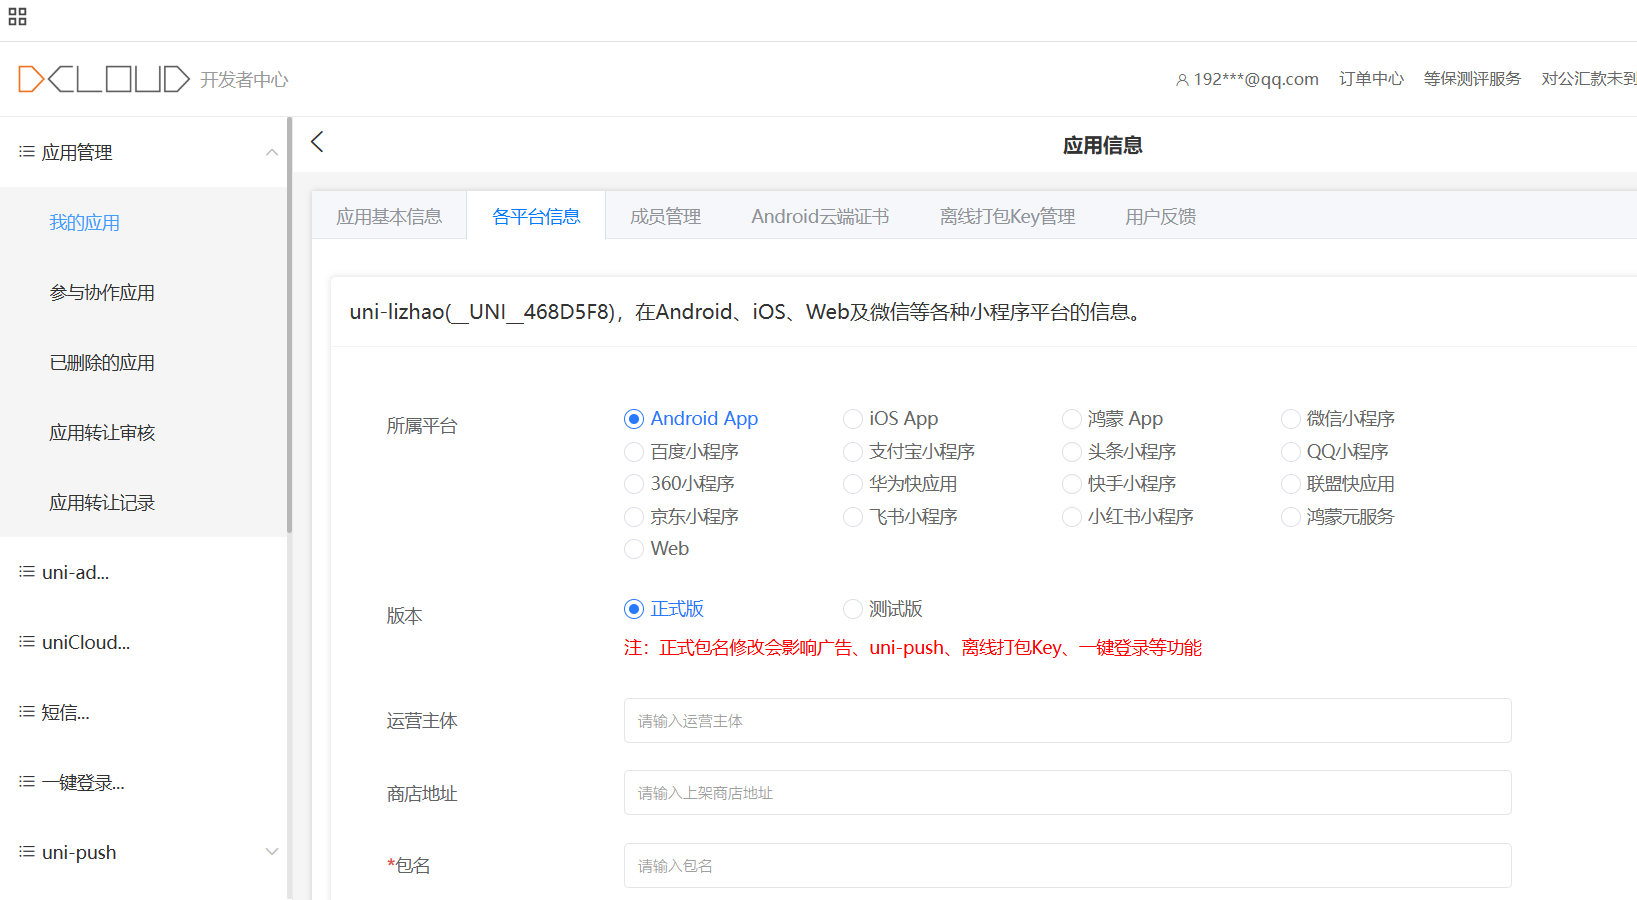
平台信息填写完成后,点击 提交,在 各平台信息 的页面,会新增一条平台信息。
创建离线Key
平台信息列表中,点击右侧的 创建离线Key,在弹出的弹层点击 创建。
创建后,点击平台信息右侧 查看离线Key,弹层内的 “Android:xxxxxx”,就是 AppKey。
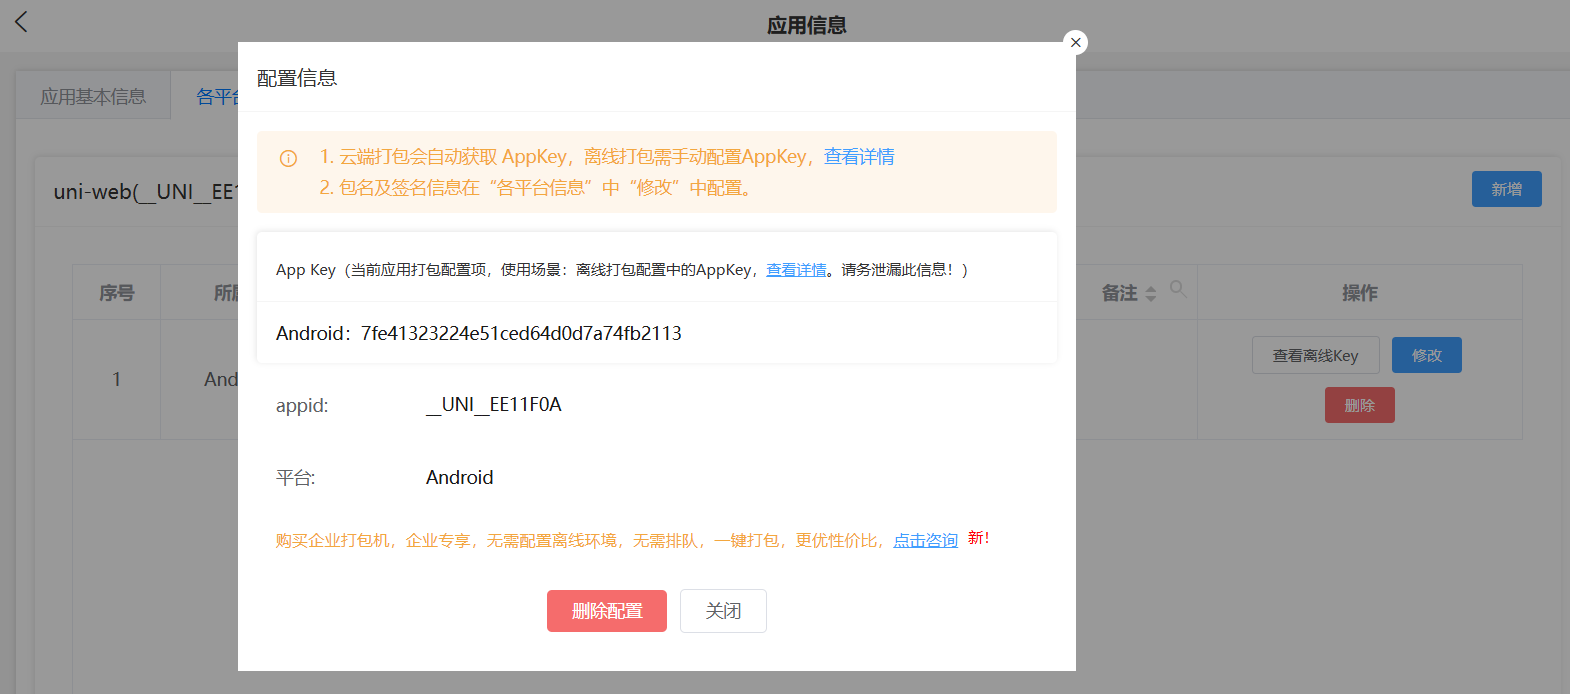
注意:云端打包会自动获取 AppKey,离线打包需手动配置 AppKey。
注意:AppKey 不区分 debug 和 release 模式。Andorid 调试,需要使用申请 AppKey 时的证书。
HBuilderX 生成 App 资源
HBuilderX 菜单栏:发行 -> 原生 App-本地打包 -> 生成本地打包 App 资源。(需任意选中一个目录或文件g)。
打包过程中,可能需要安装一些插件,按 HBuilderX 的提示,直接安装即可。
appId,是应用的唯一标识符。如果没有 appId,可在 HBuilderX 编辑器下,点击 src/manifest.json > uni-app应用标识(AppID)右侧 重新获取按钮获取,生成 appId 的同时,也会在 dcloud 开发者中心创建一个应用
如果项目已有 appid,并且 dcloud 开发者中心 有对应的应用,点击 “重新获取” 无法再生成 appId,会提示“同一个项目只能分配一个AppId”。
注意: vue-cli 命令行创建的项目,不能直接通过 cli 命令生成本地打包 App 资源,需通过 HBuilderX 打开,在 HBuilderX 可视化界面中操作导出。
注意:如果要填写已存在的应用的 appId,可用其他编辑器打开 manifest.json 文件来修改 appId。
注意: appId的值变化后,需要重新生成 Android Studio 离线打包需要的 appKey,以及修改 Android Studio 项目的一些其他配置。请谨慎修改!。
注意:导出成功,路径为:unpackage/resources/__UNI__7070C98。
新建 Android studio 工程
- 打开 Android studio,菜单栏
File>New>New Project,选择Empty Activity,点击Next。 - 填写项目信息:
- name:项目名称。
- Package name:与 Dcloud 开发者中心中该应用在安卓平台信息的包名/appid/域名一致。
- Minimum SDK:建议选 21及以上。
- Build Configuration language:选择 Groovy DSL(build.gradle)。
- 点击
Finish完成创建。
注意:App 离线 SDK 不支持 Kotlin。
注意:android SDK@2.7.0之后,提供 HBuilder-Integrate-AS 工程,可以直接导入,直接运行 simpleDemo 项目即可。
配置 Android studio 工程
将下载的 "Android 离线 SDK" 解压,解压后的目录如下:
# find . -maxdepth 1 | sed 's|[^/]*/|  |g' | sort

- HBuilder-HelloUniApp
- HBuilder-Integrate-AS
- readme
- SDK
- UniPlugin-Hello-AS
- Feature-Android.xls
- license.md
基础库配置
将 HBuilder-Integrate-AS/simpleDemo/libs 目录中的以下文件,拷贝到项目 app/libs 目录:
- android-gif-drawable-1.2.28.aar
- breakpad-build-release.aar
- lib.5plus.base-release.aar
- oaid_sdk_1.0.25.aar
- uniapp-v8-release.aar
其他 arr 文件,根据项目需求,选择性的从 SDK/lib 目录拷贝到项目 app/libs 目录,比如:
- install-apk-release.aar
- media-release.aar
- weex_videoplayer-release.aar
注意:HBuilder X 3.5.0 及以上版本新增库 breakpad-build-release.aar
注意:HBuilder X 3.8.7 及以上版本新增库 install-apk-release.aar,上架谷歌应用市场不能包含此库。
gradle.properties 配置
路径:gradle.properties。
# AndroidX
android.useAndroidX=true
android.enableJetifier=true
# Android Gradle Plugin 8.3.0 官方测试到 compileSdk=34,但工程设了 compileSdk=35,所以会提示“未验证兼容”
# 消掉警告,需要加一行:
android.suppressUnsupportedCompileSdk=35
完整 gradle.properties 文件:
# Project-wide Gradle settings.
# IDE (e.g. Android Studio) users:
# Gradle settings configured through the IDE *will override*
# any settings specified in this file.
# For more details on how to configure your build environment visit
# http://www.gradle.org/docs/current/userguide/build_environment.html
# Specifies the JVM arguments used for the daemon process.
# The setting is particularly useful for tweaking memory settings.
org.gradle.jvmargs=-Xmx2048m -Dfile.encoding=UTF-8
# When configured, Gradle will run in incubating parallel mode.
# This option should only be used with decoupled projects. For more details, visit
# https://developer.android.com/r/tools/gradle-multi-project-decoupled-projects
# org.gradle.parallel=true
# AndroidX package structure to make it clearer which packages are bundled with the
# Android operating system, and which are packaged with your app's APK
# https://developer.android.com/topic/libraries/support-library/androidx-rn
android.useAndroidX=true
# Kotlin code style for this project: "official" or "obsolete":
kotlin.code.style=official
# Enables namespacing of each library's R class so that its R class includes only the
# resources declared in the library itself and none from the library's dependencies,
# thereby reducing the size of the R class for that library
android.nonTransitiveRClass=true

# AndroidX
android.useAndroidX=true
android.enableJetifier=true

android.suppressUnsupportedCompileSdk=35
app/build.gradle 配置(子项目)
路径:app/build.gradle
build.gradle 是 Gradle 构建工具的核心配置文件,用于定义项目的构建逻辑、依赖管理和任务配置。
Gradle 是一个基于 Groovy 或 Kotlin DSL(领域特定语言)的构建自动化工具,广泛应用于 Java、Android、Kotlin 等项目。
build.gradle 文件的作用:
- 定义项目构建逻辑:配置如何编译、测试、打包和发布项目。
- 管理依赖:声明项目所需的库(如第三方库、插件)。
- 配置任务:定义自定义任务(如代码检查、资源处理)。
- 插件应用:应用 Gradle 插件(如 Java、Android、Spring Boot 插件)。
build.gradle 文件可以在根目录,也可以在各个子项目:
- 根目录:定义全局配置,适用于整个项目,如:配置子项目(模块)的公共属性,声明所有子项目共享的依赖和插件。
- 子项目(模块)目录:定义特定子项目的构建逻辑,如:配置子项目的依赖、插件和任务。可以覆盖或扩展根目录的配置。
导入基础库
dependencies {
  // 资源引用
  implementation fileTree(include: ['*.jar'], dir: 'libs')
  implementation fileTree(include: ['*.aar'], dir: 'libs')
}
注意:更新 SDK 时需要同时更新 aar/jar 文件和 build.gradle 配置。
AndroidX 适配
适配 AndroidX(HBuilderX 3.2.5 版本之后)版本,需要添加如下资源。
dependencies {
  // AndroidX
  implementation 'androidx.appcompat:appcompat:1.1.0'
  implementation 'androidx.localbroadcastmanager:localbroadcastmanager:1.0.0'
  implementation 'androidx.core:core:1.6.0'
  implementation "androidx.fragment:fragment:1.1.0"
  implementation 'androidx.recyclerview:recyclerview:1.1.0'
  implementation "com.facebook.fresco:fresco:3.4.0"
  implementation "com.facebook.fresco:middleware:3.4.0"
  implementation "com.facebook.fresco:animated-gif:3.4.0"
  implementation "com.facebook.fresco:webpsupport:3.4.0"
  implementation "com.facebook.fresco:animated-webp:3.4.0"
  implementation 'com.github.bumptech.glide:glide:4.9.0'
  implementation 'com.alibaba:fastjson:1.2.83'
  implementation 'androidx.webkit:webkit:1.5.0'
  annotationProcessor 'com.github.bumptech.glide:compiler:4.9.0'
  implementation "net.lingala.zip4j:zip4j:2.11.5"
}
uni-app 配置
在 android 节点添加 aaptOptions 配置:
android {
  // uni-app 配置
  aaptOptions {
    additionalParameters '--auto-add-overlay'
    ignoreAssetsPattern "!.svn:!.git:.*:!CVS:!thumbs.db:!picasa.ini:!*.scc:*~"
  }
}
应用信息配置
android {
  namespace 'com.lizhao.ai.coding.android'
  compileSdk 35

  defaultConfig {
    applicationId "com.lizhao.ai.coding.android"
    minSdk 26
    targetSdk 35
    versionCode 1
    versionName "1.0.0"

    testInstrumentationRunner "androidx.test.runner.AndroidJUnitRunner"
    vectorDrawables {
      useSupportLibrary true
    }
  }
}
namespace:命名空间。在新建工程,填写的 Package name 的值,一般不需要改。
applicationId:包名,一般设置为反向域名。在新建工程,填写的 Package name 的值,不建议修改。
minSdk:App 离线 SDK 最低支持21,小于 21 在部分 5.0 以下机型上将无法正常使用。
targetSdk:建议设置为 30 或以上。如果设置为 34,需要 android 节点下新增 packagingOptions 配置。
versionCode:版本号(整数值),用于各应用市场的升级判断,建议与
manifest.json中versionCode值一致。versionName:版本名称(字符串),在系统应用管理程序中显示的版本号,建议与manifest.json中versionName值一致。
注意:namespace、applicationId,应与 Dcloud 开发者中心中该应用在安卓平台信息的 包名/appid/域名一致。
签名信息配置
在 android 节点下,配置应用的签名信息:
android {
  signingConfigs {
    config {
      keyAlias 'springboot'
      keyPassword '123456'
      storeFile file('../keystore/springboot-keystore.p12')
      storePassword '123456'
      v1SigningEnabled true
      v2SigningEnabled true
    }
  }

  buildTypes {
    debug {
      signingConfig signingConfigs.config
      minifyEnabled false
      proguardFiles getDefaultProguardFile('proguard-android-optimize.txt'), 'proguard-rules.pro'
    }
    release {
      signingConfig signingConfigs.config
      minifyEnabled false
      proguardFiles getDefaultProguardFile('proguard-android-optimize.txt'), 'proguard-rules.pro'
    }
  }
}
注意:signingConfigs 配置的证书信息,必需与Dcloud 开发者中心生成 AppKey 时的证书信息一致,否则导致 AppKey 校验失败。
注意:需要将 springboot-keystore.p12 存放在根目录的 keystore 目录下。
完整版 build.gradle
plugins {
  alias(libs.plugins.androidApplication)
  alias(libs.plugins.jetbrainsKotlinAndroid)
}

android {
  namespace 'com.lizhao.ai.coding.android'
  compileSdk 35

  defaultConfig {
    applicationId "com.lizhao.ai.coding.android"
    minSdk 26
    targetSdk 35
    versionCode 1
    versionName "1.0.0"

    testInstrumentationRunner "androidx.test.runner.AndroidJUnitRunner"
    vectorDrawables {
      useSupportLibrary true
    }
  }

  signingConfigs {
    config {
      keyAlias 'springboot'
      keyPassword '123456'
      storeFile file('../keystore/springboot-keystore.p12')
      storePassword '123456'
      v1SigningEnabled true
      v2SigningEnabled true
    }
  }

  buildTypes {
    debug {
      signingConfig signingConfigs.config
      minifyEnabled false
      proguardFiles getDefaultProguardFile('proguard-android-optimize.txt'), 'proguard-rules.pro'
    }
    release {
      signingConfig signingConfigs.config
      minifyEnabled false
      proguardFiles getDefaultProguardFile('proguard-android-optimize.txt'), 'proguard-rules.pro'
    }
  }

  compileOptions {
    sourceCompatibility JavaVersion.VERSION_1_8
    targetCompatibility JavaVersion.VERSION_1_8
  }
  kotlinOptions {
    jvmTarget = '1.8'
  }
  buildFeatures {
    compose true
  }
  composeOptions {
    kotlinCompilerExtensionVersion '1.5.1'
  }
  packaging {
    jniLibs {
      useLegacyPackaging = true
    }
    resources {
      excludes += '/META-INF/{AL2.0,LGPL2.1}'
    }
  }

  // uni-app 配置
  aaptOptions {
    additionalParameters '--auto-add-overlay'
    ignoreAssetsPattern "!.svn:!.git:.*:!CVS:!thumbs.db:!picasa.ini:!*.scc:*~"
  }
}

dependencies {
  // 资源引用
  implementation fileTree(include: ['*.jar'], dir: 'libs')
  implementation fileTree(include: ['*.aar'], dir: 'libs')

  // AndroidX
  implementation 'androidx.appcompat:appcompat:1.1.0'
  implementation 'androidx.localbroadcastmanager:localbroadcastmanager:1.0.0'
  implementation 'androidx.core:core:1.6.0'
  implementation "androidx.fragment:fragment:1.1.0"
  implementation 'androidx.recyclerview:recyclerview:1.1.0'
  implementation "com.facebook.fresco:fresco:3.4.0"
  implementation "com.facebook.fresco:middleware:3.4.0"
  implementation "com.facebook.fresco:animated-gif:3.4.0"
  implementation "com.facebook.fresco:webpsupport:3.4.0"
  implementation "com.facebook.fresco:animated-webp:3.4.0"
  implementation 'com.github.bumptech.glide:glide:4.9.0'
  implementation 'com.alibaba:fastjson:1.2.83'
  implementation 'androidx.webkit:webkit:1.5.0'
  annotationProcessor 'com.github.bumptech.glide:compiler:4.9.0'
  implementation "net.lingala.zip4j:zip4j:2.11.5"

  implementation libs.androidx.core.ktx
  implementation libs.androidx.lifecycle.runtime.ktx
  implementation libs.androidx.activity.compose
  implementation platform(libs.androidx.compose.bom)
  implementation libs.androidx.ui
  implementation libs.androidx.ui.graphics
  implementation libs.androidx.ui.tooling.preview
  implementation libs.androidx.material3
  testImplementation libs.junit
  androidTestImplementation libs.androidx.junit
  androidTestImplementation libs.androidx.espresso.core
  androidTestImplementation platform(libs.androidx.compose.bom)
  androidTestImplementation libs.androidx.ui.test.junit4
  debugImplementation libs.androidx.ui.tooling
  debugImplementation libs.androidx.ui.test.manifest
}
这是一个混合项目:
- 主要功能:uni-app 运行时容器
- UI 框架:Jetpack Compose(原生 UI)
- 编程语言:Kotlin
- 最低版本:Android 8.0 (API 26)
- 签名:已配置(debug/release 共用)
Androidmanifest.xml 配置
路径:app/src/main/AndroidManifest.xml
AndroidManifest.xml 是 Android 应用的核心配置文件,用于定义应用的基本信息、组件、权限和硬件需求等。它在 Android 项目中扮演着至关重要的角色,是 Android 系统了解应用行为和需求的入口。
AndroidManifest.xml 的主要作用:
- 定义应用基本信息:package-包名(应用的唯一标识符)、versionCode-内部版本号(整数)、versionName-用户可见的版本号(字符串)。
- 声明应用组件:Android 应用的四大组件(Activity、Service、BroadcastReceiver、ContentProvider)必须在
AndroidManifest.xml中声明,否则系统无法识别和使用它们。 - 声明应用权限:请求权限-应用需要的权限(如访问网络、读取存储等)、定义权限-提供自定义权限。
- 声明硬件和软件需求:硬件需求-应用需要的硬件特性(如摄像头、GPS)、软件需求-应用支持的最低 Android 版本。
- 定义应用图标和名称:应用的启动图标、应用的显示名称。
- 配置应用启动行为:应用的入口 Activity。
- 声明应用主题:定义应用的默认主题。
- 配置应用兼容性:应用支持的屏幕尺寸和密度、是否支持分屏或多窗口模式。
应用基础配置
<?xml version="1.0" encoding="utf-8"?>
<manifest xmlns:android="http://schemas.android.com/apk/res/android"
    xmlns:tools="http://schemas.android.com/tools">

  <application
      android:allowBackup="true"
      android:dataExtractionRules="@xml/data_extraction_rules"
      android:fullBackupContent="@xml/backup_rules"
      android:icon="@mipmap/ic_launcher"
      android:label="@string/app_name"
      android:roundIcon="@mipmap/ic_launcher_round"
      android:supportsRtl="true"
      android:theme="@style/Theme.Android"
      tools:targetApi="31">
  </application>

</manifest>
注意:@ 是 Android 资源引用符号,用于引用 app/src/main/res/ 目录下的资源文件。
@[资源类型]/[资源名称]
| 符号 | 含义 | 示例 |
|---|---|---|
@xml/xxx |
引用 res/xml/xxx.xml 文件 |
@xml/backup_rules |
@string/xxx |
引用 res/values/**.xml 中的字符串 |
@string/app_name |
@drawable/xxx |
引用 res/drawable/xxx.png 图片 |
@drawable/icon |
- android:allowBackup:允许系统备份应用数据
- android:icon:应用图标
- android:label:应用名称
- android:roundIcon:圆形图标
- android:supportsRtl:支持从右到左布局(阿拉伯语等)
- android:theme:应用主题
- tools:targetApi:工具指定目标API 33(Android 13)
Appkey 配置
在 application 节点下,创建 meta-data 节点:
- name:dcloud_appkey
- value:已申请的离线 Appkey。
<meta-data
    android:name="dcloud_appkey"
    android:value="b1ca0d38af5cbb5e356331388f441826" />
Activity 配置
新建的项目默认会有一个 MainActivity 的节点,必须删掉!
<?xml version="1.0" encoding="utf-8"?>
<manifest xmlns:android="http://schemas.android.com/apk/res/android"
    xmlns:tools="http://schemas.android.com/tools">

  <application
      android:allowBackup="true"
      android:dataExtractionRules="@xml/data_extraction_rules"
      android:fullBackupContent="@xml/backup_rules"
      android:icon="@mipmap/ic_launcher"
      android:label="@string/app_name"
      android:roundIcon="@mipmap/ic_launcher_round"
      android:supportsRtl="true"
      android:theme="@style/Theme.Aiandroid"
      tools:targetApi="31">
    <activity
        android:name=".MainActivity"
        android:exported="true"
        android:label="@string/app_name"
        android:theme="@style/Theme.Aiandroid">
      <intent-filter>
        <action android:name="android.intent.action.MAIN" />

        <category android:name="android.intent.category.LAUNCHER" />
      </intent-filter>
    </activity>
  </application>

</manifest>
然在 application 节点,添加 activity 配置:
注意:PandoraEntry 是主入口(桌面启动),PandoraEntryActivity 是第三方调用入口。
注意: android:scheme 是 Android 中用于定义 URI(统一资源标识符) 的协议部分(Scheme),通常与 intent-filter 配合使用,用于声明应用可以处理的特定类型的 URI。如:http、https、mailto、tel,或者自定义(如:myapp)。
注意:为适配折叠屏,需要在 PandoraEntryActivity 的 android:configChanges 属性中追加 “smallestScreenSize|screenLayout|screenSize”。
注意:为适配暗黑模式,需要在 PandoraEntryActivity 的 android:configChanges 属性中追加 “uiMode”。
<activity
    android:name="io.dcloud.PandoraEntry"
    android:exported="true"
    android:configChanges="orientation|keyboardHidden|keyboard|navigation"
    android:label="@string/app_name"
    android:launchMode="singleTask"
    android:hardwareAccelerated="true"
    android:theme="@style/TranslucentTheme"
    android:screenOrientation="user"
    android:windowSoftInputMode="adjustResize" >
  <intent-filter>
    <action android:name="android.intent.action.MAIN" />
    <category android:name="android.intent.category.LAUNCHER" />
  </intent-filter>
  <intent-filter>
    <category android:name="android.intent.category.DEFAULT" />
    <category android:name="android.intent.category.BROWSABLE" />
    <action android:name="android.intent.action.VIEW" />
    <data android:scheme="yizhao" />
  </intent-filter>
</activity>

<activity
    android:name="io.dcloud.PandoraEntryActivity"
    android:exported="true"
    android:launchMode="singleTask"
 android:configChanges="orientation|keyboardHidden|screenSize|mcc|mnc|fontScale|keyboard|smallestScreenSize|screenLayout|screenSize|uiMode"
    android:hardwareAccelerated="true"
    android:permission="com.miui.securitycenter.permission.AppPermissionsEditor"
    android:screenOrientation="user"
    android:theme="@style/DCloudTheme"
    android:windowSoftInputMode="adjustResize">
</activity>
- android:name:uni-app 入口页面
- android:exported:允许外部启动(必须)
- android:launchMode:单任务栈模式
- android:hardwareAccelerated:开启硬件加速
- android:theme:半透明主题(启动闪屏)
- android:screenOrientation:跟随用户屏幕方向
- android:windowSoftInputMode:键盘弹出时调整布局大小
- android:scheme:自定义协议。比如:定义为yizhao,可以通过 yizhao://xxx 从外部唤起应用。
暗黑模式配置
在 application节点,添加 meta-data 节点。
<meta-data
  android:name="DCLOUD_DARK_MODE"
  android:value="light" />
其中可用的模式分别为 light、dark、auto, 此设置会影响启动时的默认模式,另外在运行时可使用plus.nativeUI.setUIStyle 动态修改主题模式。
注意:PandoraEntryActivity 的 ndroid:configChanges 配置必须包含 uiMode。
完整版 Androidmanifest.xml
注意:android:theme="@style/Theme.Aiandroid",取的是 app/src/main/res/values/themes.xml 文件中定义的值,可能需要根据 themes.xml 文件的实际内容修改。
<?xml version="1.0" encoding="utf-8"?>
<manifest xmlns:android="http://schemas.android.com/apk/res/android"
    xmlns:tools="http://schemas.android.com/tools">

  <application
      android:allowBackup="true"
      android:dataExtractionRules="@xml/data_extraction_rules"
      android:fullBackupContent="@xml/backup_rules"
      android:icon="@mipmap/ic_launcher"
      android:label="@string/app_name"
      android:roundIcon="@mipmap/ic_launcher_round"
      android:supportsRtl="true"
      android:theme="@style/Theme.Aiandroid"
      tools:targetApi="31">
    <meta-data
        android:name="dcloud_appkey"
        android:value="b1ca0d38af5cbb5e356331388f441826" />

    <meta-data
        android:name="DCLOUD_DARK_MODE"
        android:value="light" />

    <activity
        android:name="io.dcloud.PandoraEntry"
        android:exported="true"
        android:configChanges="orientation|keyboardHidden|keyboard|navigation"
        android:label="@string/app_name"
        android:launchMode="singleTask"
        android:hardwareAccelerated="true"
        android:theme="@style/TranslucentTheme"
        android:screenOrientation="user"
        android:windowSoftInputMode="adjustResize" >
      <intent-filter>
        <action android:name="android.intent.action.MAIN" />
        <category android:name="android.intent.category.LAUNCHER" />
      </intent-filter>
      <intent-filter>
        <category android:name="android.intent.category.DEFAULT" />
        <category android:name="android.intent.category.BROWSABLE" />
        <action android:name="android.intent.action.VIEW" />
        <data android:scheme="yizhao" />
      </intent-filter>
    </activity>

    <activity
        android:name="io.dcloud.PandoraEntryActivity"
        android:exported="true"
        android:launchMode="singleTask"
        android:configChanges="orientation|keyboardHidden|screenSize|mcc|mnc|fontScale|keyboard|smallestScreenSize|screenLayout|screenSize|uiMode"
        android:hardwareAccelerated="true"
        android:permission="com.miui.securitycenter.permission.AppPermissionsEditor"
        android:screenOrientation="user"
        android:theme="@style/DCloudTheme"
        android:windowSoftInputMode="adjustResize">
    </activity>
  </application>

</manifest>
这个 Manifest 定义了一个标准的 uni-app 应用:
- 入口:PandoraEntry(桌面图标)
- 主题:半透明闪屏 + 浅色模式
- 特性:硬件加速、自定义方向
- 深度链接:支持 yizhao:// 唤起
- 兼容:Android 13+
strings.xmls 配置
路径:app/src/main/res/values/strings.xml。
应用名称配置
app_name 字段,为安装到手机上桌面显示的应用名称,建议与 manifest.json 中 name(基础配置中的应用名称)对应。
<resources>
  <string name="app_name">一兆窗含</string>
</resources>
app资源配置
创建文件夹:
app/src/main/assetsapp/src/main/assets/apps
导入资源
- 将 Android 离线
SDK>assets>data文件夹拷贝到刚刚创建的 assets 文件夹下。注意:SDK升级时,data下资源需要同时更新。 - 创建 apps 文件夹并拷贝资源。将 HBuilderX 中的项目导出的“打包App资源”(即
unpackage/resources/__UNI__7070C98文件夹),复制到assets-> apps下。
dcloud_control.xml 配置
路径:app/src/main/assets/data/dcloud_control.xml。
将 appid 字段值改为 uni-app 应用的 id,即 manifest.json 文件中的 appid 字段。
<hbuilder>
  <apps>
    <app appid="__UNI__7070C98" appver=""/>
  </apps>
</hbuilder>
注意:生成自定义基座,需要 hbuilder 节点下添加 debug="true" 和 syncDebug="true"。
uts插件
注意:需要HBuilder X 4.18版本及以上。
如果 uni-app 项目包括 uts 原生插件,资源导出之后会在 resources 目录下新增 uni_modules 目录。
添加uts依赖
将 utsplugin-release.aar 拷贝到 libs 目录下,在 build.gradle 中添加:
dependencies {
  implementation "com.squareup.okhttp3:okhttp:3.12.12"
  implementation "androidx.core:core-ktx:1.6.0"
  implementation "org.jetbrains.kotlin:kotlin-stdlib:1.8.10"
  implementation "org.jetbrains.kotlin:kotlin-reflect:1.6.0"
  implementation "org.jetbrains.kotlinx:kotlinx-coroutines-core:1.3.8"
  implementation "org.jetbrains.kotlinx:kotlinx-coroutines-android:1.3.8"
  implementation "com.github.getActivity:XXPermissions:18.0"
}
配置uts插件
uts原生插件导入参考文档,将 uts 插件导入到 android 项目中。
具体示例可以参考离线打包SDK中的 UniPlugin-Hello-AS 工程。
运行
在 Android Studio 中生成应用(即构建 APK 文件)。
- 点击菜单栏的 File > Sync Project with Gradle Files,同步项目的 Gradle 配置。当你修改了
build.gradle文件或其他 Gradle 相关配置后,需要执行此操作,以确保 Android Studio 能够正确加载项目的依赖项和配置。 - 在 Android Studio 中,点击菜单栏的
Build>Generate Signed Bundle / APK...> 选择之前生成签名 > 选择构建类型(debug|Release)> 点击Finish。 - 生成的 APK 文件会默认放在项目的
app/build/outputs/apk/release/或者app/debug/app-debug.apk或者app/release/app-release.apk目录下(Android Studio,可能看不到目录,可在电脑的“文件资资源管理器”中查看)。
常见问题
未配置签名信息
如果没有配置签名信息,Android Studio 可能会隐藏 Generate Signed Bundle / APK... 选项。
如果你只是想生成一个未签名的 APK 用于测试,可以跳过签名步骤。点击菜单栏的 Build > Build Bundle(s) / APK(s) > Build APK(s)。
未配置 appkey 或者配置错误
在安卓机上安装 Android Studio 生成的 APK 应用时,提示“未配置 appkey 或者配置错误”。
这种情况不用怀疑,肯定是 appkey 配置不对,确认以下问题:
- appKey:必须是 dcloud 开发者中心 的 我的应用,uni-app 项目对应应用生成的安卓平台的离线Key。
- appid:
app/src/main/assets/data/dcloud_control.xml文件的appid,与 uni-app 项目manifest.json的appid一致。 - 应用包名:创建工程时的
Package name、app/build.gradle>android.namespace、app/build.gradle>android.applicationId、app/src/main/AndroidManifest.xml>application.provider的android:authorities,与 Dcloud 开发者中心中该应用在安卓平台信息的 包名/appid/域名一致。 - 证书签名:
app/build.gradle>android.signingConfigs的证书签名信息,与在 Dcloud 开发者中心 生成离线 appKey 的证书签名信息一样。
Android studio,真机联调,接口请求报错
Spring Boot 提供的接口,通过 ngrok 做了内网穿透:https://xxx.ngrok-free.app -> http://localhost:80。Android Studio -> run app 后,模拟器联调可以成功请求接口,但是真机(红米k70Pro)联调时,接口请求报错:
java.io.InterruptedIOException: timeout
    at dc.squareup.okhttp3.RealCall.timeoutExit(Unknown Source:3)
    at dc.squareup.okhttp3.RealCall.execute(Unknown Source:24)
    at io.dcloud.feature.weex.adapter.DCWXHttpAdapter$1.run(SourceFile:19)
    at java.util.concurrent.ThreadPoolExecutor.runWorker(ThreadPoolExecutor.java:1145)
    at java.util.concurrent.ThreadPoolExecutor$Worker.run(ThreadPoolExecutor.java:644)
    at java.lang.Thread.run(Thread.java:1012)
Caused by: java.io.IOException: Canceled
    at dc.squareup.okhttp3.internal.http.RetryAndFollowUpInterceptor.intercept(Unknown Source:115)
    at dc.squareup.okhttp3.internal.http.RealInterceptorChain.proceed(Unknown Source:23)
    at dc.squareup.okhttp3.internal.http.RealInterceptorChain.proceed(Unknown Source:1)
    at dc.squareup.okhttp3.RealCall.getResponseWithInterceptorChain(Unknown Source:16)
    at dc.squareup.okhttp3.RealCall.execute(Unknown Source:10)
原因: 红米手机的 MIUI 系统,对后台网络请求可能有更严格的限制。
解决: 手机设置 -> 更多设置 -> 开发者选项(需要开启该选项,不同机型步骤可能有差异) -> 开启停用 adb 授权超时功能、关闭启用系统优化。